
EC2 (Elastic Compute Cloud) is a service that allows you to launch and manage virtual servers in the cloud. You can use EC2 instances to run applications, host websites, perform data analysis, and more.
In this blog post, We will learn how to create an EC2 instance in AWS step by step.
What is Required to Create an AWS Instance?
To create an EC2 instance, you need to have an AWS account and access to the AWS console. You also need to have a basic understanding of the following concepts:
- Region: A region is a geographical area where AWS has data centers. You can choose the region that is closest to your customers or has the services that you need. Each region has multiple availability zones, which are isolated locations within a region that provide redundancy and fault tolerance.
- AMI: An AMI (Amazon Machine Image) is a template that contains the operating system and software configuration for your EC2 instance. You can choose from the AMIs that AWS provides, or you can create your own custom AMIs.
- Instance Type: An instance type is a specification that defines the CPU, memory, storage, and network capacity of your EC2 instance. You can choose from the different instance types that AWS offers, depending on your performance and budget requirements.
- Security Group: A security group is a set of rules that control the inbound and outbound traffic for your EC2 instance. You can create and assign security groups to your EC2 instances to allow or deny access to specific ports and protocols.
- Key Pair: A key pair is a pair of public and private keys that you use to connect to your EC2 instance. You can generate and download a key pair from the AWS console, or you can use your own existing key pair.
How to Create EC2 Instance in AWS Step by Step
Now that we have covered the prerequisites, let’s see how to create an EC2 instance in AWS step by step.
Step 1: Log in to the AWS Console
The first step is to log in to the AWS console using your AWS account credentials. You can access the AWS console from this link: https://console.aws.amazon.com/
Step 2: Choose a Region
The next step is to choose a region where you want to launch your EC2 instance. You can select the region from the drop-down menu at the top right corner of the console.
For this example, I will choose US East (N. Virginia) as the region.
Step 3: Go to the EC2 Dashboard
The next step is to go to the EC2 dashboard, where you can manage your EC2 instances and other related resources. You can go to the EC2 dashboard by clicking on the Services menu at the top left corner of the console and selecting EC2 under the Compute category.
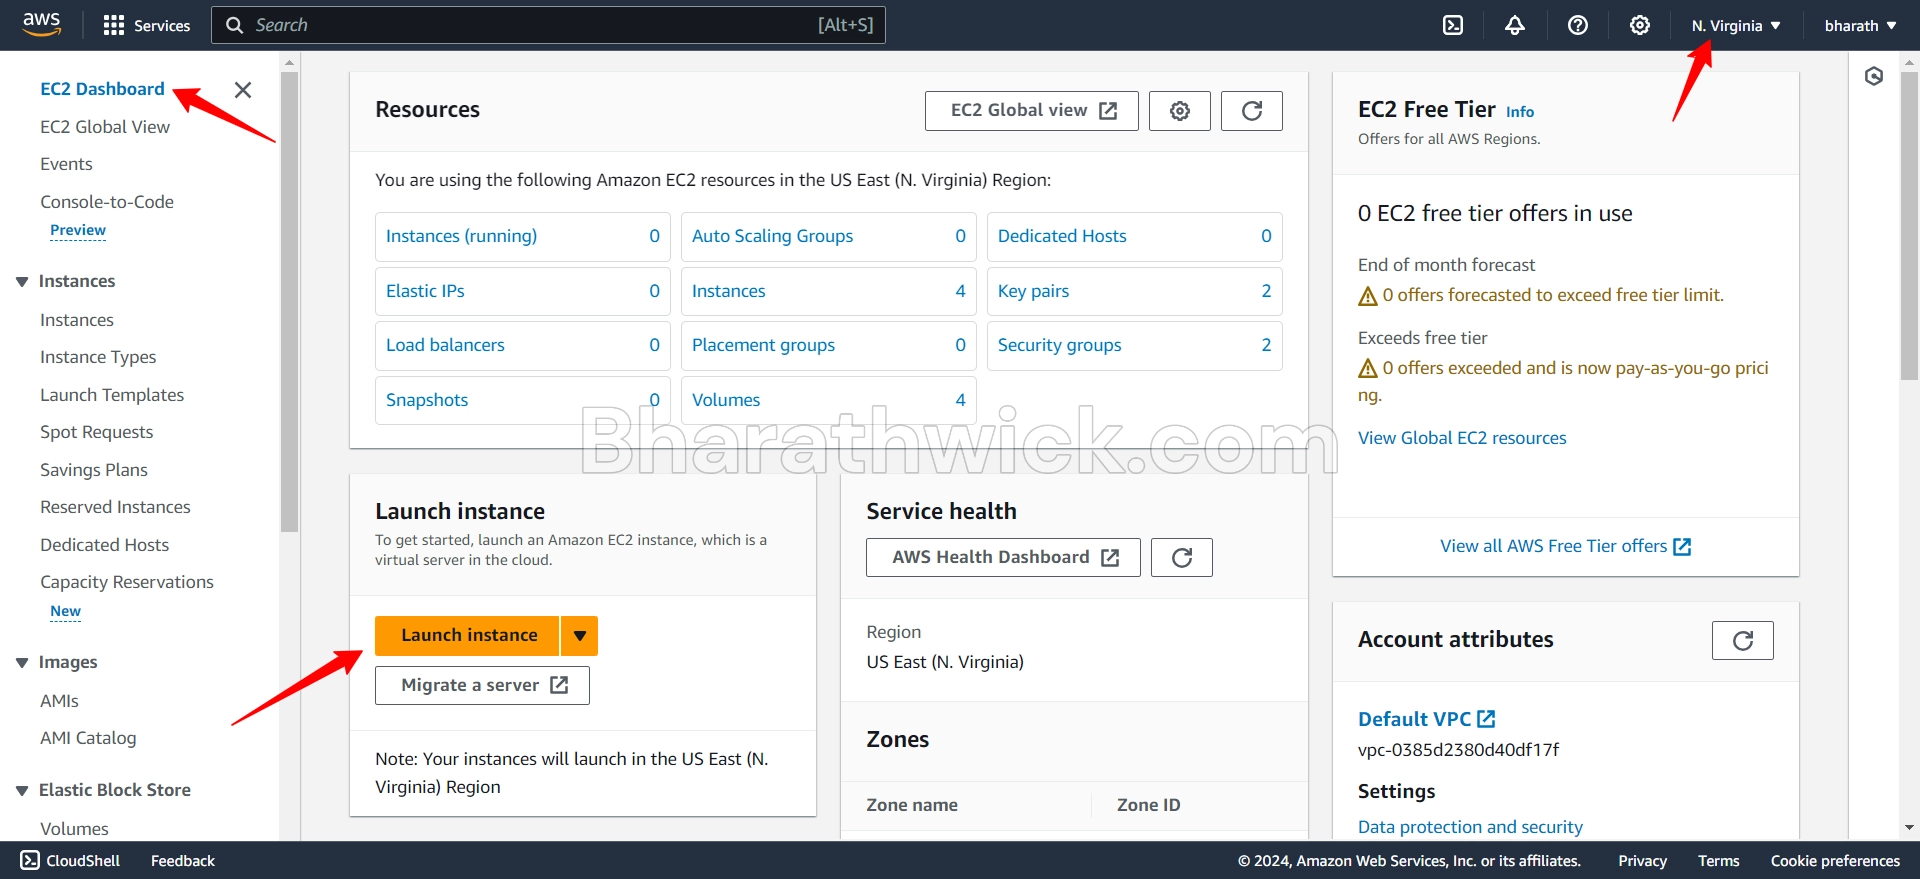
Step 4: Launch an EC2 Instance
The next step is to launch an EC2 instance. You can do that by clicking on the Launch Instance button on the EC2 dashboard.
You will see a page where you can choose the AMI for your EC2 instance. You can select from the Quick Start tab, where you can see the most popular AMIs that AWS provides, or you can browse the AWS Marketplace tab, where you can see the AMIs that are offered by third-party vendors. You can also search for an AMI by name, ID, or keyword.
For this example, I will choose the Amazon Linux 2 AMI (HVM), SSD Volume Type from the Quick Start tab. This AMI is based on the Linux operating system and supports the HVM (Hardware Virtual Machine) virtualization type, which provides better performance and scalability. It also uses the SSD (Solid State Drive) volume type, which provides faster and more reliable storage.

Click on the Select button to proceed.
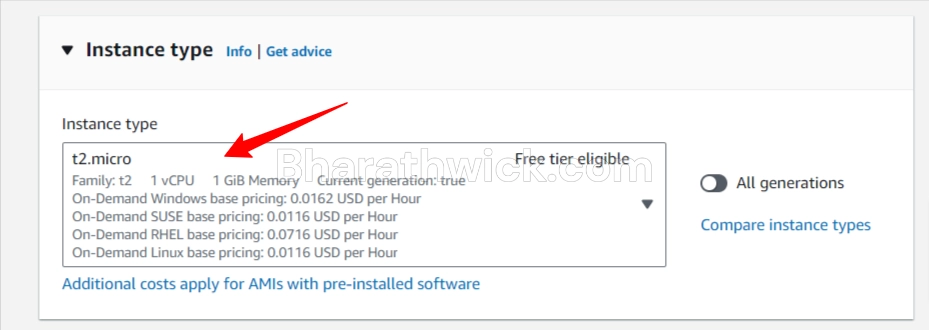
You will see a page where you can choose the instance type for your EC2 instance. You can select from the different instance types that AWS offers, depending on your performance and budget requirements. You can also compare the features and prices of the different instance types by clicking on the Compare button.
For this example, I will choose the t2.micro instance type, which is the smallest and cheapest instance type that AWS offers. It has 1 vCPU (virtual CPU), and 1 GiB (Gibibyte) of memory, and supports the EBS (Elastic Block Store) volume type, which allows you to attach additional storage volumes to your EC2 instance.
Click on the Next: Configure Instance Details button to proceed.
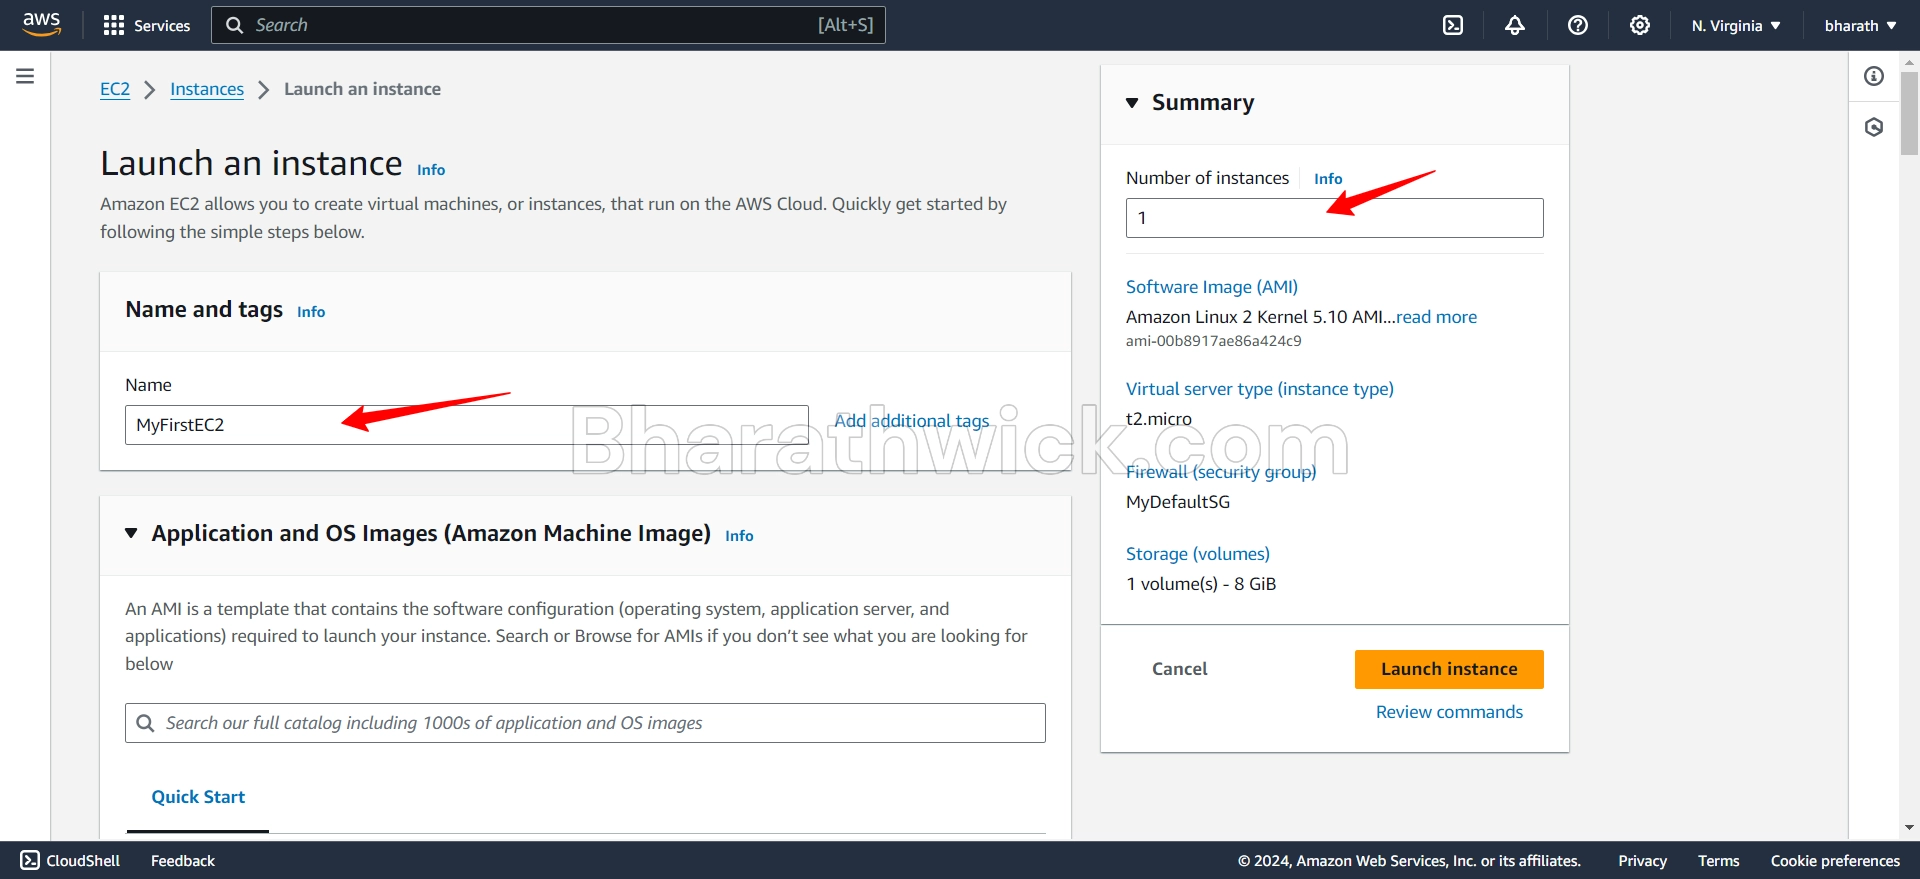
You will see a page where you can configure the instance details for your EC2 instance. You can modify the following settings:
- Number of instances: The number of EC2 instances that you want to launch. For this example, I will keep it as 1.
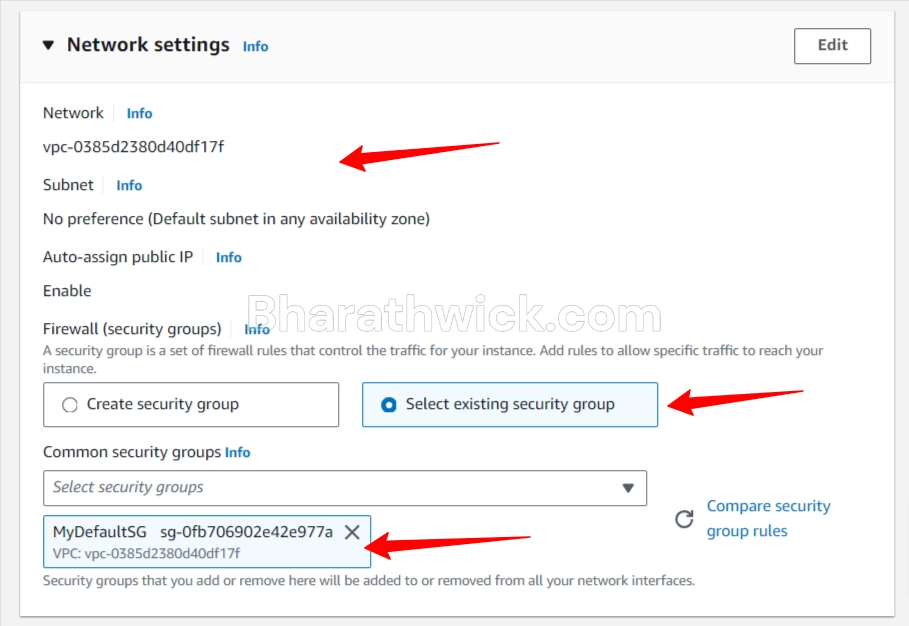
- Network: The virtual network where you want to launch your EC2 instance. You can choose from the default VPC (Virtual Private Cloud) that AWS provides, or you can create your own custom VPC. For this example, I will choose the default VPC.
- Subnet: The subnet within the VPC where you want to launch your EC2 instance. A subnet is a range of IP addresses that are assigned to your EC2 instances and other resources. You can choose from the default subnets that AWS provides, or you can create your own custom subnets. For this example, I will choose the default subnet.
- Auto-assign Public IP: The option to assign a public IP address to your EC2 instance. A public IP address is an IP address that is accessible from the internet. You can choose to enable or disable this option. For this example, I will enable it, so that we can connect to our EC2 instance from the internet.
- IAM role: The IAM role that you want to attach to your EC2 instance. An IAM role is an identity that you can create and assign to your EC2 instance, to grant it temporary access to certain AWS resources. For this example, I will leave it as None, as we don’t need any additional permissions for our EC2 instance.
- Shutdown behavior: The action that you want to perform when you stop or terminate your EC2 instance. You can choose to either stop or terminate your EC2 instance. Stopping an EC2 instance means that you can start it again later, while terminating an EC2 instance means that you can’t start it again and you will lose any data that is stored on the instance. For this example, I will choose to stop our EC2 instance, as we may want to use it again later.
- Enable termination protection: The option to prevent accidental termination of your EC2 instance. You can choose to enable or disable this option. For this example, I will disable it, as we don’t need to protect our EC2 instance from accidental termination.
- Monitoring: The option to enable or disable detailed monitoring for your EC2 instance. Detailed monitoring means that AWS will collect and report metrics about your EC2 instance every minute, instead of every 5 minutes. This can help you to troubleshoot and optimize your EC2 instance performance. However, this option may incur additional charges. For this example, I will disable it, as we don’t need detailed monitoring for our EC2 instance.
- Tenancy: The option to choose the type of tenancy for your EC2 instance. Tenancy refers to how your EC2 instance is isolated from other EC2 instances on the same physical server. You can choose from the following types of tenancy:
- Shared: Your EC2 instance will share the same physical server with other EC2 instances from different AWS accounts. This is the default and cheapest option, but it may have lower performance and security.Dedicated: Your EC2 instance will have a dedicated physical server that is not shared with any other EC2 instances. This option may have higher performance and security, but it is more expensive and less flexible.Host: Your EC2 instance will have a dedicated physical server that is shared with other EC2 instances from your own AWS account. This option may have higher performance and security, and it also allows you to use some features that are not available in the other options, such as customizing the hardware specifications and controlling the placement of your EC2 instances. However, this option is the most expensive and requires you to reserve and pay for the entire physical server.
Click on the Next: Add Storage button to proceed.
You will see a page where you can add storage volumes to your EC2 instance. A storage volume is a block of storage space that you can attach to your EC2 instance and use to store your data. You can choose from the following types of storage volumes:
- instance and use it to store your data. An EBS volume is independent of the lifecycle of your EC2 instance, which means that you can detach it from your EC2 instance and attach it to another EC2 instance, or keep it even after you terminate your EC2 instance. An EBS volume also supports features such as encryption, snapshots, and different performance levels. You can choose from the following types of EBS volumes:
- General Purpose SSD (gp2): This is the default and recommended type of EBS volume, which provides a balance of performance and cost. It offers a baseline performance of 3 IOPS (Input/Output Operations Per Second) per GiB of storage, with a minimum of 100 IOPS and a maximum of 16,000 IOPS. It also supports bursting, which means that you can temporarily increase the IOPS of your EBS volume up to 3,000 IOPS for gp2 volumes under 1,000 GiB, or 3,000 IOPS plus the baseline performance for gp2 volumes over 1,000 GiB.
- Provisioned IOPS SSD (io1): This type of EBS volume is designed for applications that require high and consistent performance. It allows you to specify the IOPS of your EBS volume, up to 64,000 IOPS per volume or 50 IOPS per GiB, whichever is lower. It also offers a higher durability of 99.9%, compared to 99.8% for gp2 volumes.
- Throughput Optimized HDD (st1): This type of EBS volume is designed for applications that require high sequential throughput, such as big data, data warehousing, and log processing. It offers a baseline performance of 40 MiB/s per TiB of storage, with a minimum of 40 MiB/s and a maximum of 500 MiB/s. It also supports bursting, which means that you can temporarily increase the throughput of your EBS volume up to 250 MiB/s per TiB of storage.
- Cold HDD (sc1): This type of EBS volume is designed for applications that require low-cost and infrequent access to data, such as archival and backup. It offers a baseline performance of 12 MiB/s per TiB of storage, with a minimum of 12 MiB/s and a maximum of 250 MiB/s. It also supports bursting, which means that you can temporarily increase the throughput of your EBS volume up to 80 MiB/s per TiB of storage.
- Instance Store: An instance store volume is a temporary and ephemeral storage volume that is attached to your EC2 instance and uses the physical storage of the underlying server. An instance store volume is faster and cheaper than an EBS volume, but it has some limitations. An instance store volume is dependent on the lifecycle of your EC2 instance, which means that you will lose any data that is stored on the instance store volume when you stop or terminate your EC2 instance. An instance store volume also does not support features such as encryption, snapshots, and resizing. Not all EC2 instance types support instance store volumes, and the size and number of instance store volumes vary depending on the instance type.
For this example, I will keep the default settings for the storage volumes, which are:
- Root volume: An EBS volume of type gp2, with a size of 8 GiB, and encrypted by default.
- No additional volumes: No other EBS or instance store volumes.

Click on the Next: Add Tags button to proceed.
You will see a page where you can add tags to your EC2 instance. Tags are key-value pairs that you can use to organize and identify your EC2 instances and other resources. You can add up to 50 tags per EC2 instance.
For this example, I will add a tag with the key Name and the value EC2-Instance.
Click on the Next: Configure Security Group button to proceed.
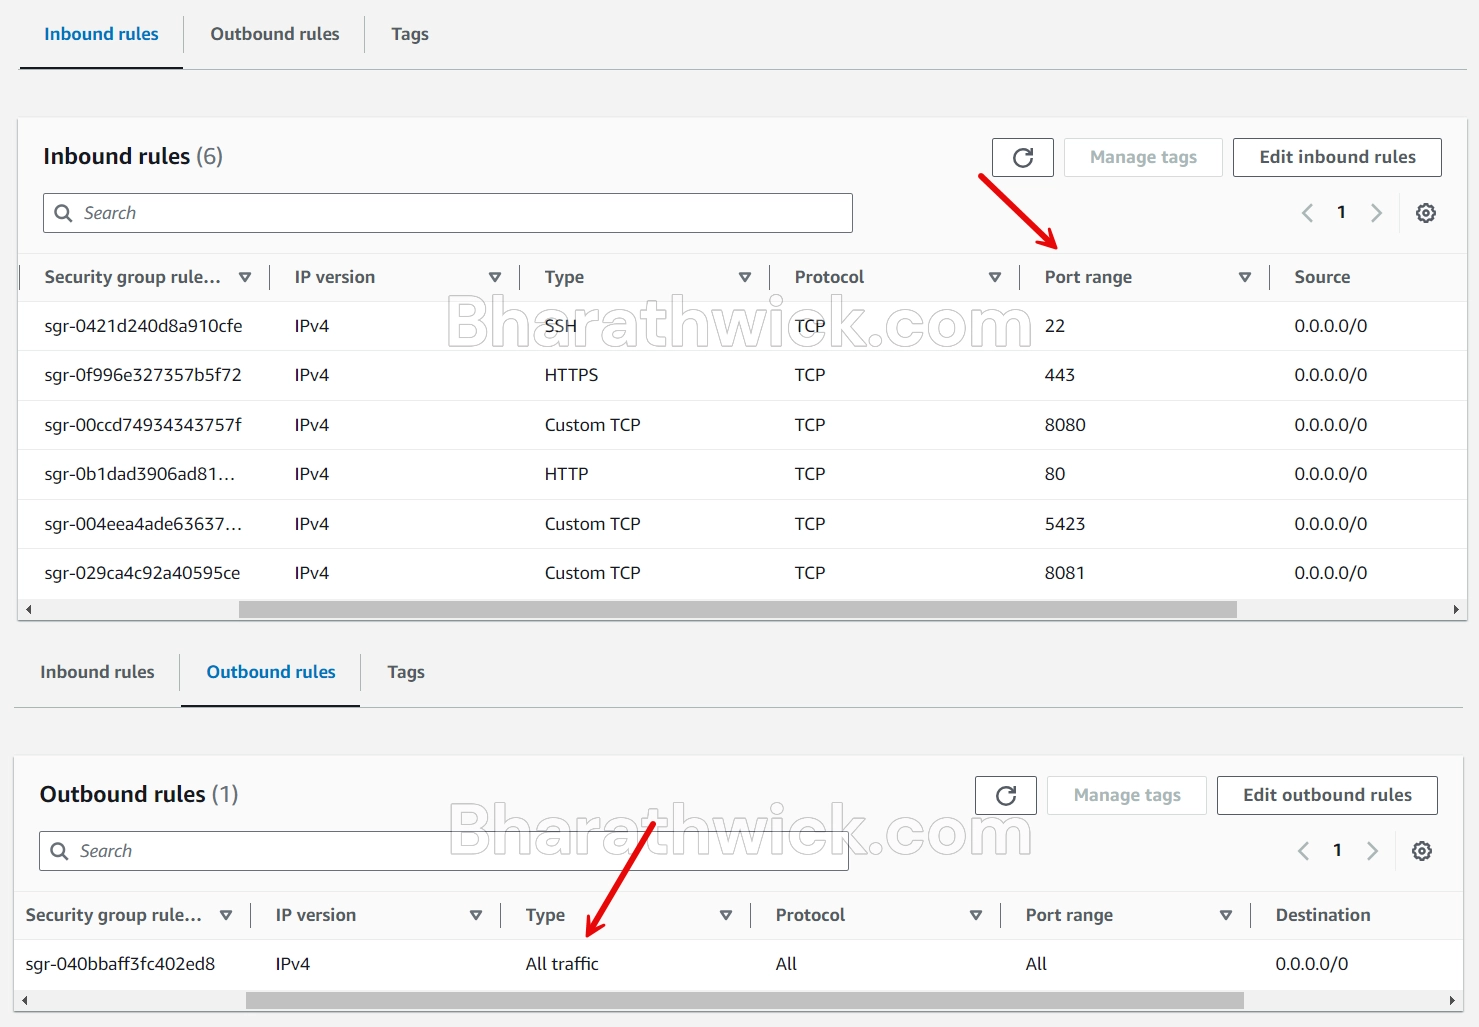
You will see a page where you can configure the security group for your EC2 instance. A security group is a set of rules that control the inbound and outbound traffic for your EC2 instance.
You can create and assign security groups to your EC2 instances to allow or deny access to specific ports and protocols. For this example, I will create a new security group with the following settings:
- Security group name: EC2-Security-Group
- Description: This security group allows SSH and HTTP access to the EC2 instance.
- Inbound rules: Two rules that allow SSH (port 22) and HTTP (port 80) access from anywhere (0.0.0.0/0).
- Outbound rules: The default rule that allows all traffic to any destination.
Click on the Review and Launch button to proceed.
You will see a page where you can review the details of your EC2 instance and launch it. You can see the AMI, instance type, security group, key pair, and other settings that you have configured.
You can also edit any of these settings before launching your EC2 instance. For this example, I will keep the default settings and launch our EC2 instance.
Click on the Launch button to launch your EC2 instance.
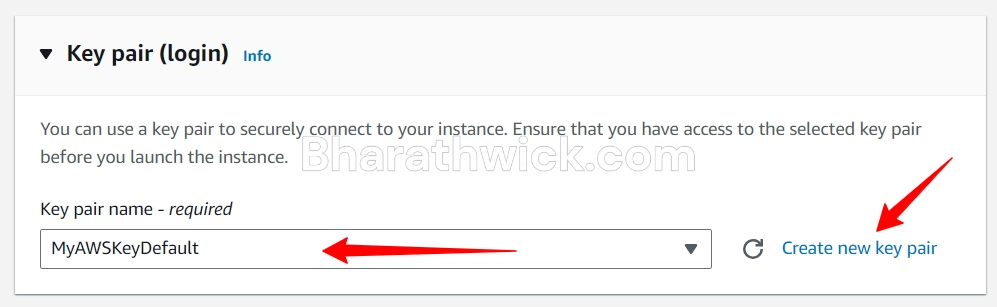
You will see a pop-up window where you can choose the key pair that you want to use to connect to your EC2 instance. A key pair is a pair of public and private keys that you use to authenticate and encrypt your connection to your EC2 instance.
You can choose from the existing key pairs that you have created or imported, or you can create a new key pair. For this example, I will create a new key pair with the following settings:
- Key pair name: MyAWSKeyDefault
- File format: PEM (Privacy Enhanced Mail), which is a file format that contains the private key in plain text.
Click on the Download Key Pair button to download the key pair file to your local machine. You will need this file to connect to your EC2 instance later. Make sure that you store this file in a secure and accessible location, as you will not be able to download it again from AWS.
Click on the Launch Instances button to launch your EC2 instance.
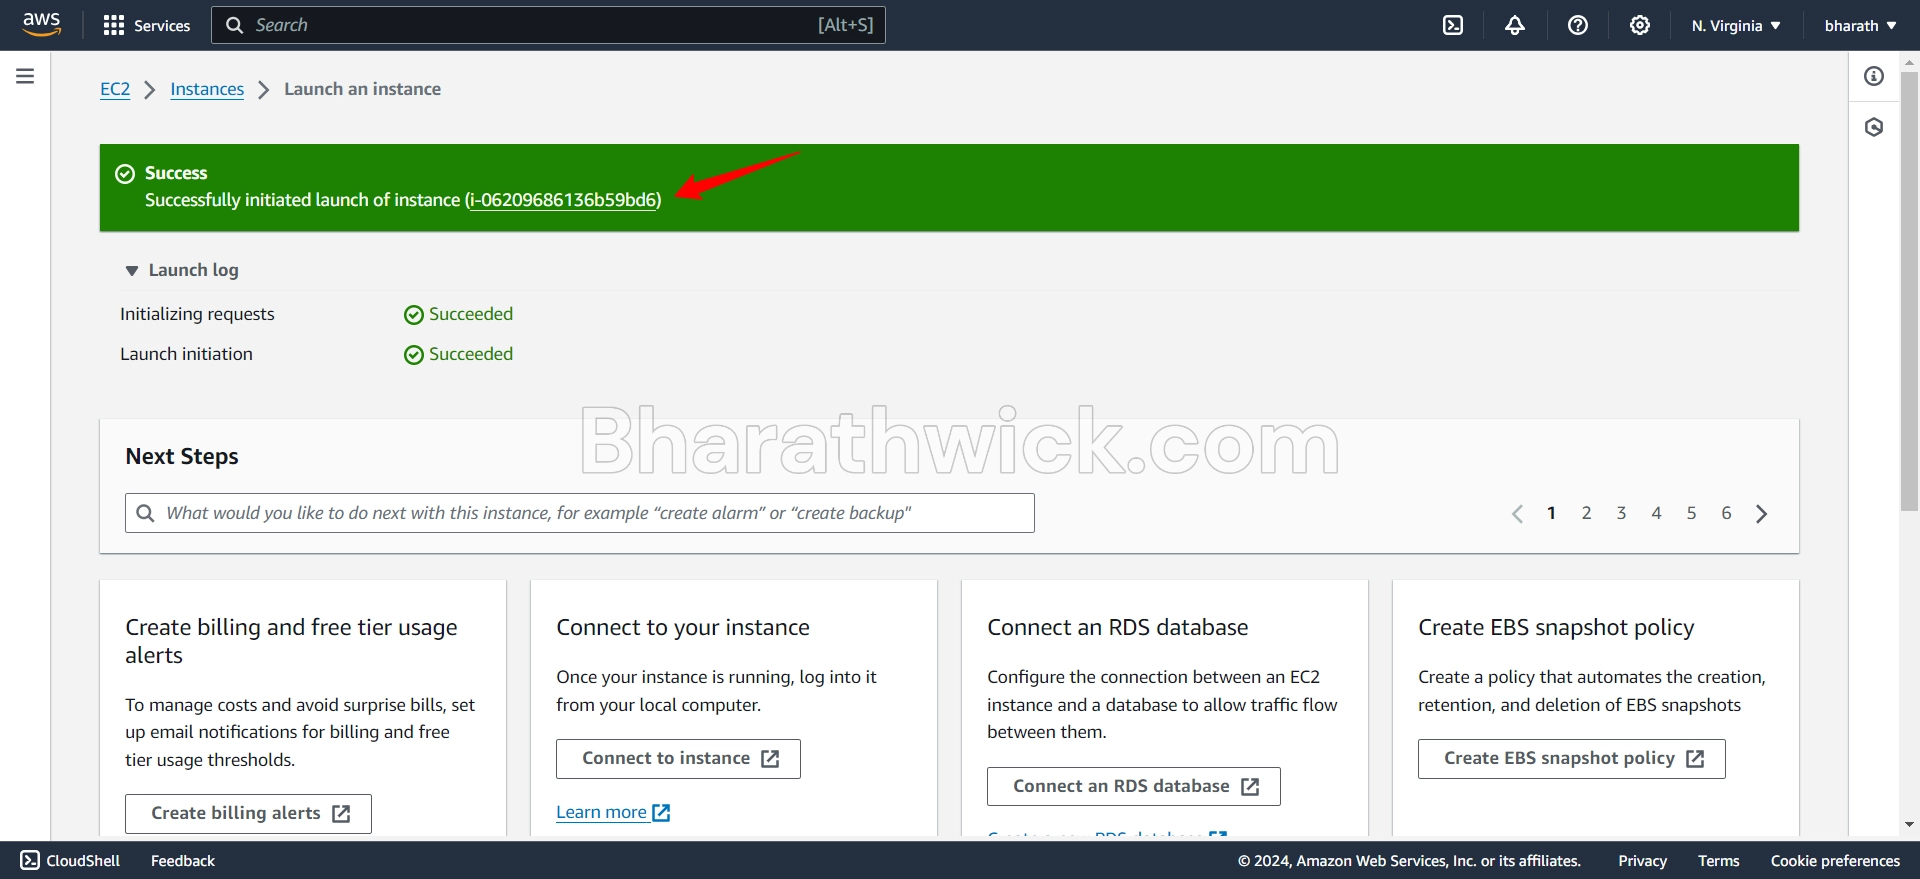
You will see a confirmation page where you can see the status of your EC2 instance launch. You can also see the instance ID, which is a unique identifier for your EC2 instance. You can use this ID to refer to your EC2 instance in the AWS console or the AWS CLI.
Click on the View Instances button to go to the EC2 dashboard and see your EC2 instance.
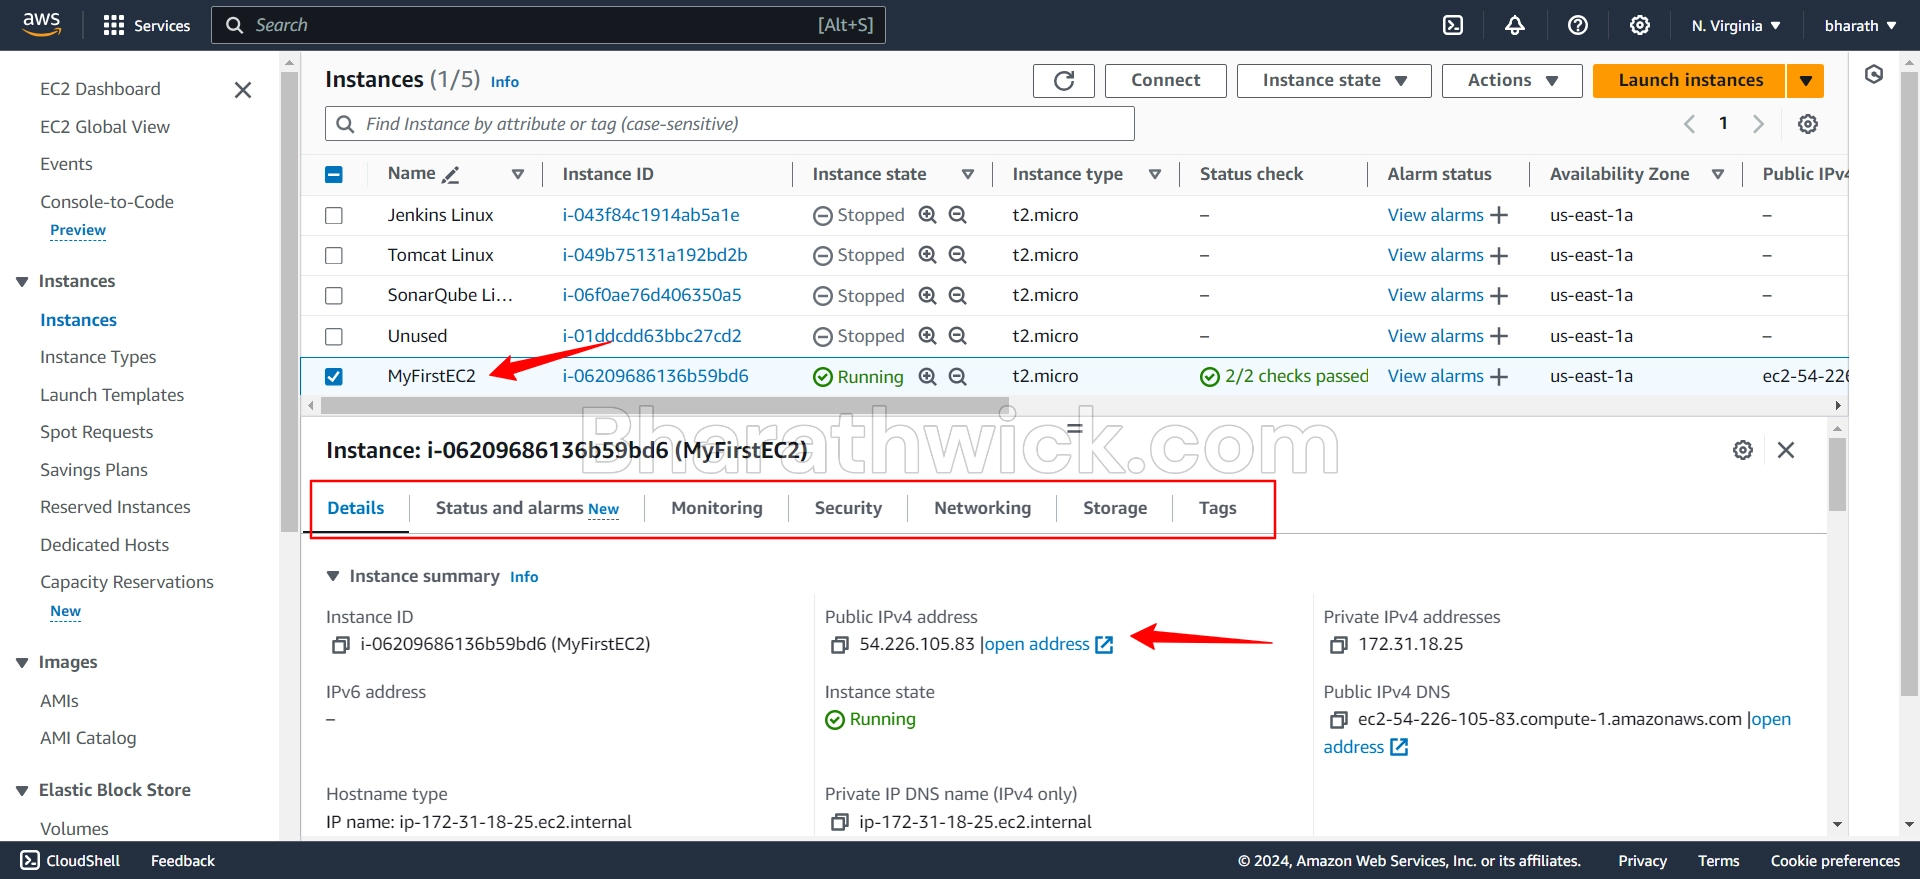
You will see a page where you can see the details of your EC2 instance and manage it. You can see the instance ID, state, public IP address, security group, and other information about your EC2 instance. You can also perform actions such as start, stop, terminate, reboot, and connect to your EC2 instance.
You have successfully created an EC2 instance in AWS step by step.
Conclusion
In this blog post, we have learned how to create an EC2 instance in AWS step by step. We have also learned how to choose the AMI, instance type, storage volume, security group, and key pair for our EC2 instance.
EC2 instances are useful for running applications, hosting websites, performing data analysis, and more. You can create and manage EC2 instances using the AWS console, the AWS CLI, or the AWS SDKs.
I hope you found this blog post helpful and informative. If you have any questions or feedback, please feel free to leave a comment below. Thank you for reading!