Apache Maven is a software project management and comprehension tool that can help you manage the build, reporting, and documentation of your Java projects. In this blog post, I will show you how to install Apache Maven on AWS Linux using the command line.
Prerequisites
Before you begin, you will need the following:
- An AWS account and access to an AWS Linux instance. You can use the AWS console or the AWS CLI to launch and connect to your instance.
- A user with sudo privileges on the instance. You can use the default ec2-user or create your own user.
- A stable internet connection and an SSH client.
Update the System
It’s good practice to ensure your system is up-to-date.
sudo yum update -y
sudo yum upgrade -y
Step 1: Download Apache Maven
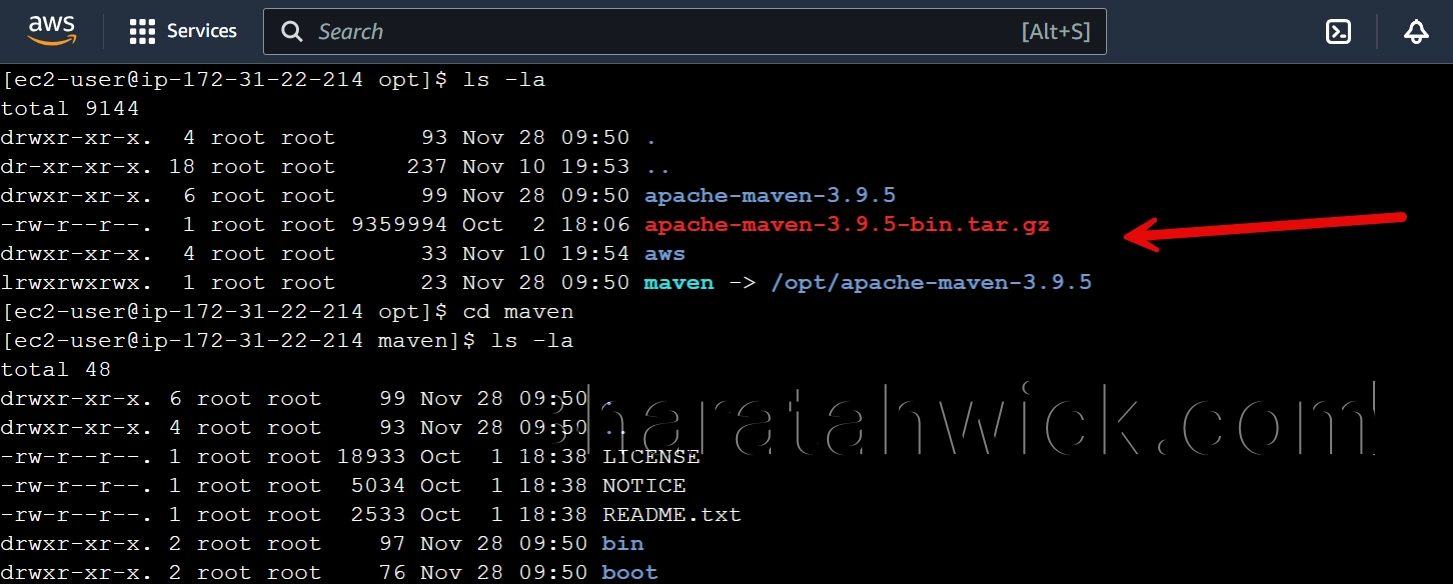
Download the Apache Maven binary archive from the official website. You can use the wget command to download the file to the /opt directory. The -O option specifies the output file name.
Replace the version number with the latest one available on the website (https://maven.apache.org/release-notes-all.html)
sudo wget https://apache.osuosl.org/maven/maven-3/3.9.5/binaries/apache-maven-3.9.5-bin.tar.gz -O /opt/apache-maven-3.9.5-bin.tar.gz
Step 2: Extract the Archive
Extract the archive file to the /opt directory. You can use the tar command with the -x option to extract, the -f option to specify the file name, and the -C option to specify the destination directory.
sudo tar -xf /opt/apache-maven-3.9.5-bin.tar.gz -C /optStep 3: Create a Symbolic Link
Create a symbolic link to the extracted directory. You can use the ln command with the -s option to create a soft link, and the /opt/maven as the link name.
This will make it easier to access and update Maven in the future.
sudo ln -s /opt/apache-maven-3.9.5 /opt/maven
Step 4: Add Maven to the System PATH
Add Maven to the PATH environment variable. You can use the echo command to append the export statement to the /etc/profile.d/maven.sh file, which will be executed when the user logs in.
The tee command with the -a option will append the output to the file, and the sudo command will run the command as the root user.
The chmod command with the +x option will make the file executable, and the source command will execute the file in the current shell.
echo 'export PATH=$PATH:/opt/maven/bin' | sudo tee -a /etc/profile.d/maven.sh
sudo chmod +x /etc/profile.d/maven.sh
source /etc/profile.d/maven.sh
Step 5: Verify Maven Installation
Verify the installation by checking the Maven version. You can use the mvn command with the -v option to display the version information.
mvn -v
Conclusion
Now, we are successfully installed the Apache Maven on AWS Linux using the command line SSH. You downloaded the binary archive from the official website, extracted it to the /opt directory, created a symbolic link to the extracted directory, added Maven to the PATH environment variable, and verified the installation by checking the Maven version.
You can now use Maven to manage your Java projects and dependencies on AWS Linux. If you have any questions or feedback, please leave a comment below. Thank you for reading!
